La gestion de votre boîte de réception Gmail est essentielle pour rester productif et organisé. Le tri de Gmail par expéditeur est l'un des moyens les plus simples de désencombrer votre boîte de réception, de localiser les messages et de rester maître de votre messagerie.
Dans ce guide détaillé, nous vous présenterons différentes méthodes pour trier votre boîte de réception Gmail par expéditeur à l'aide d'outils tels que la barre de recherche, les filtres et les étiquettes.
TL;DR : Comment trier la boîte de réception Gmail par expéditeur ?
Le tri de Gmail en fonction de l'expéditeur peut vous aider à retrouver rapidement les e-mails importants, à désencombrer votre boîte de réception et à gagner du temps.
Utilisez des outils tels que la fonction "Rechercher des courriers électroniques provenant de", la barre de recherche Gmail et les filtres pour organiser vos courriers électroniques sans effort.
Pourquoi trier Gmail par expéditeur ?
Trier votre boîte de réception Gmail par expéditeur est une façon intelligente de mettre de l'ordre dans le chaos d'une boîte de réception surchargée.
Grâce aux outils de tri automatisé du service Gmail, la gestion de centaines d'e-mails quotidiens devient plus efficace, ce qui vous permet de rester productif sans être débordé.
Le tri par expéditeur vous permet d'adopter une approche ciblée pour relever ce défi. Voici pourquoi c'est important :
Trouvez rapidement les messages importants : Qu'il s'agisse d'un courriel urgent d'un client, de mises à jour de collègues ou de notes personnelles de la famille, le tri par expéditeur vous permet de localiser les messages importants sans avoir à faire défiler ou à passer au crible des courriels sans rapport les uns avec les autres.
Désencombrez votre boîte de réception : Les messages de vente, les lettres d'information et les messages moins importants peuvent encombrer votre boîte de réception et vous distraire de ce qui est important. Le tri par expéditeur vous permet de regrouper et de gérer ces messages en vrac, ce qui rend votre boîte de réception plus propre et plus facile à parcourir.
Améliorer la productivité : Au lieu de perdre un temps précieux à rechercher des courriers électroniques, vous pouvez vous concentrer sur les réponses à apporter aux questions importantes.
Comment trier Gmail par expéditeur sur le bureau : 4 méthodes
Décrivons les étapes du tri des messages par expéditeur sur le bureau à l'aide des outils du navigateur Gmail.
Nous présentons ci-dessous quatre méthodes. Choisissez celle qui vous convient le mieux. Commençons.
Méthode 1. Utiliser la fonction "Rechercher les courriels de".
Si vous recherchez le moyen le plus rapide de localiser des courriers électroniques provenant d'un expéditeur spécifique, cette méthode est la bonne. Elle est simple, ne nécessite aucune configuration et donne des résultats instantanés. Voici comment procéder :
1. Connectez-vous à Gmail: Ouvrez votre compte Gmail dans votre navigateur.
2. Localiser un message: Trouvez un e-mail de l'expéditeur que vous souhaitez filtrer.

3. Cliquez avec le bouton droit de la souris sur l'e-mail: Sélectionnez "Rechercher les courriels de" dans le menu déroulant.
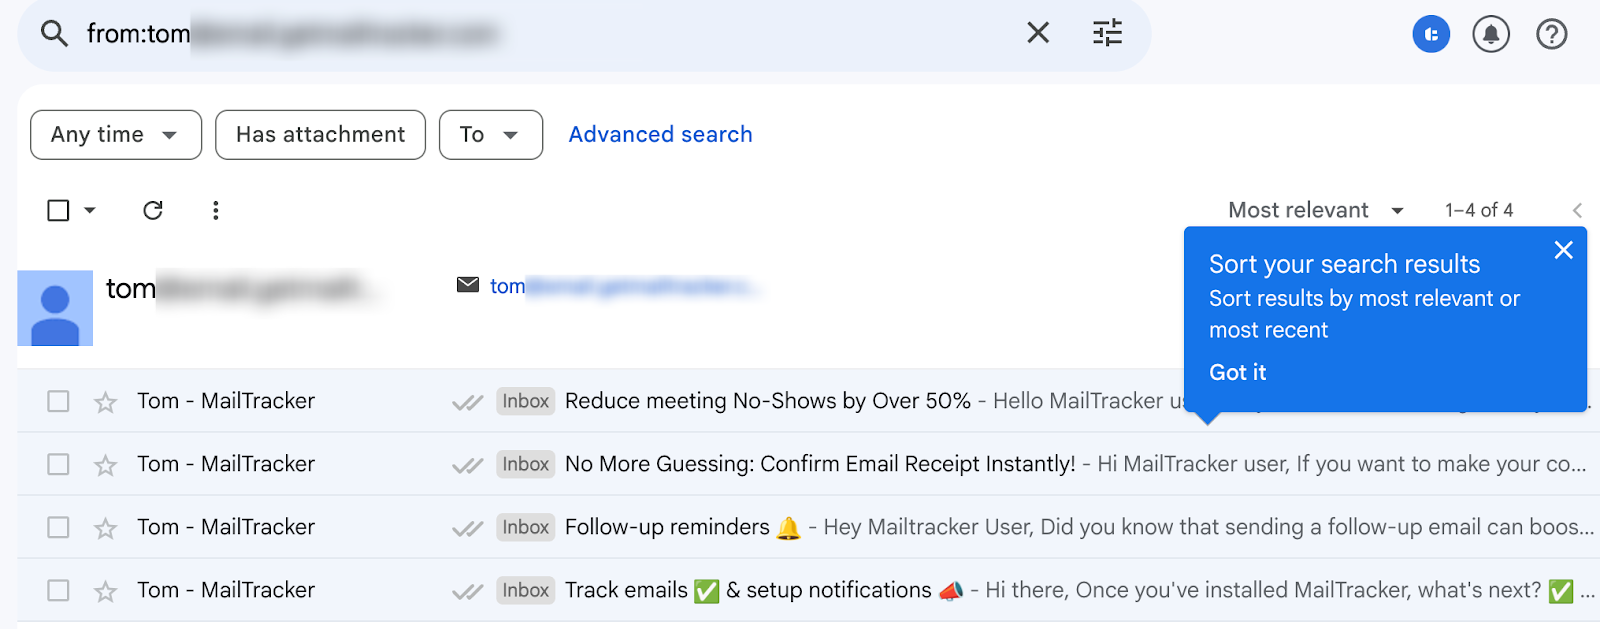
Gmail affichera tous les messages de cet expéditeur, y compris les messages archivés ou mis à la corbeille. Cette méthode est idéale pour effectuer des recherches rapides sans configuration supplémentaire. Voici à quoi cela ressemble :

Méthode 2. Utiliser la barre de recherche
La barre de recherche de Gmail est l'un des outils les plus polyvalents pour localiser rapidement les courriers électroniques d'un expéditeur spécifique.
Que vous connaissiez l'adresse électronique exacte ou simplement le nom de l'expéditeur, cette méthode vous permet d'affiner facilement votre recherche. Voici comment en tirer le meilleur parti :
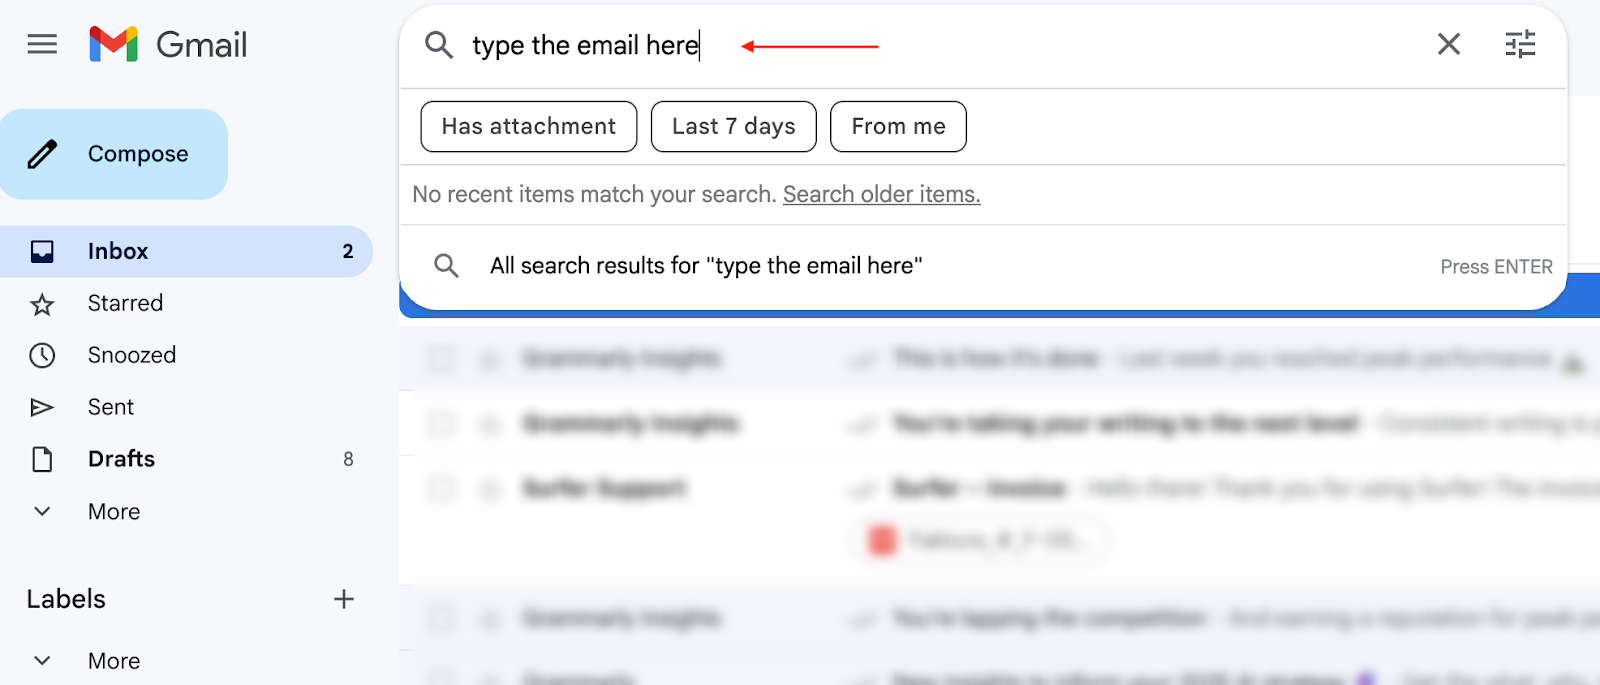
1. Saisissez l'adresse électronique de l'expéditeur: Saisissez from : [email@example.com] dans la barre de recherche et appuyez sur Entrée.

2. Recherche par nom: Si vous ne connaissez pas l'adresse électronique de l'expéditeur, tapez son nom.
3. Recherche d'e-mails provenant de plusieurs expéditeurs: Utilisez l'opérateur OR. Par exemple, from:email1@example.com OR from:email2@example.com.
La méthode du champ de recherche de Gmail est un moyen simple mais puissant de trouver tous les courriels provenant d'expéditeurs spécifiques.
Méthode 3. Utiliser les options de recherche avancée
Pour des résultats plus précis, les options de recherche avancée de Gmail vous permettent de filtrer les messages par expéditeur, plage de dates ou mots-clés :
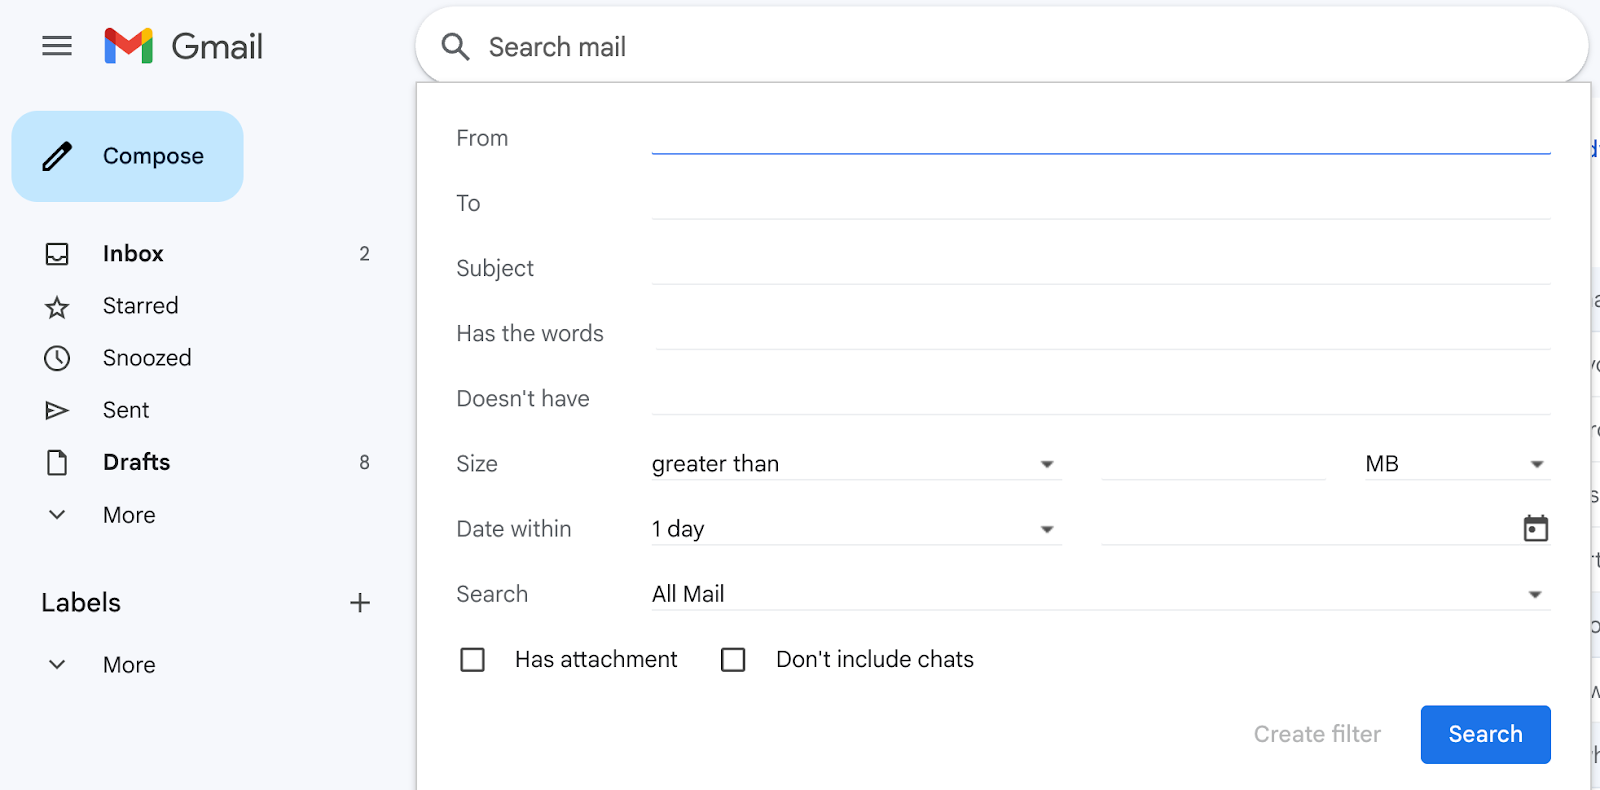
1. Accédez à la recherche avancée: Cliquez sur le bouton "Afficher les options de recherche" (icône représentant trois curseurs) dans la barre de recherche.

2. Filtrer par expéditeur: Saisissez l'adresse électronique de l'expéditeur dans le champ "De".
3. Ajouter des critères de recherche: Utilisez des filtres supplémentaires tels que des mots-clés de sujet ou une fourchette de dates.
4. Cliquez sur Rechercher: Gmail n'affiche que les messages correspondant à vos critères.
La recherche avancée permet aux utilisateurs de Gmail de mieux contrôler la manière dont ils localisent les messages électroniques, en particulier dans les grands comptes de messagerie.
Méthode 4. Créer des filtres pour l'automatisation
Les filtres vous permettent de trier et d'organiser automatiquement les courriels entrants en fonction de critères spécifiques.
En mettant en place des filtres, vous pouvez rationaliser la gestion de votre boîte de réception et réduire la nécessité d'un tri manuel. Voici comment créer et utiliser des filtres :
1. Ouvrez les options de recherche : Cliquez sur le bouton "Afficher les options de recherche" (l'icône des trois curseurs) dans la barre de recherche.
2. Définissez l'expéditeur : Dans le champ "De", saisissez l'adresse électronique ou le nom de l'expéditeur.
3. Créez un filtre : En bas du menu des options de recherche, cliquez sur "Créer un filtre" et choisissez les actions souhaitées, par exemple :
- Appliquer une étiquette : Marquer automatiquement les courriels de cet expéditeur avec une étiquette spécifique.
- Sautez la boîte de réception : Déplacez l'e-mail dans un autre dossier pour ne pas encombrer votre boîte de réception.
- Marquer comme lu : Marquer automatiquement ces courriels comme lus dès leur arrivée.
4. Appliquer aux e-mails existants : Sélectionnez l'option permettant d'appliquer le filtre aux conversations correspondantes déjà présentes dans votre boîte de réception.
Les filtres sont un excellent choix pour automatiser les tâches répétitives, telles que le tri des lettres d'information, la hiérarchisation des courriels des clients ou la gestion des mises à jour de projets. Une fois configurés, ils fonctionnent en arrière-plan, garantissant que votre boîte de réception reste organisée sans effort supplémentaire.
Trier Gmail par expéditeur sur mobile
Gérer sa boîte de réception en déplacement ne doit pas être un défi.
L'application mobile de Gmail propose des outils intuitifs pour vous aider à trier les e-mails par expéditeur, ce qui vous permet de rester organisé au travail, dans les transports ou en voyage. Voici comment procéder sur Android et iPhone :
Sur Android
1. Ouvrez Gmail: Lancez l'application Gmail sur votre appareil Android.
2. Utilisez la barre de recherche: Saisissez le nom ou l'adresse électronique de l'expéditeur.
3. Affiner la recherche: Utilisez des mots-clés ou des plages de dates pour réduire les résultats.
Sur iPhone
1. Ouvrez Gmail: Lancez l'application Gmail sur votre iPhone ou iPad.
2. Saisissez le nom de l'expéditeur: Saisissez l'adresse électronique ou le nom de l'expéditeur dans la barre de recherche.
3. Appuyez sur Rechercher: Gmail filtre et affiche les messages de cet expéditeur.
Conseils pour la gestion de la boîte de réception Gmail
Voici quelques conseils pour vous aider à rester au top de vos performances en matière d'e-mail :
Utilisez les outils de tri automatique de Gmail : Gmail propose des onglets intégrés tels que "Primaire", "Social" et "Promotions" pour classer automatiquement vos courriels.
Vous pouvez ainsi vous concentrer sur vos messages personnels ou professionnels, tout en reléguant les lettres d'information et les messages promotionnels dans des onglets distincts. Activez ces onglets dans vos paramètres pour une boîte de réception plus rationnelle.
Archiver les anciens courriels : Au lieu de laisser les anciens courriels encombrer votre boîte de réception, archivez-les. Les messages auxquels vous n'avez pas besoin d'accéder immédiatement sont ainsi mis à l'abri des regards, tout en restant consultables ultérieurement.
Établissez une routine quotidienne : Consacrez 10 minutes par jour à l'organisation de votre boîte de réception. Supprimez les courriels indésirables, répondez aux courriels urgents et étiquetez ou archivez les messages si nécessaire. Une routine cohérente permet d'éviter l'accumulation de courriels et de s'assurer que l'on sait toujours où trouver les courriels importants.
Gérer votre boîte de réception à l'aide d'étiquettes
Les étiquettes changent la donne en ce qui concerne le regroupement des courriels par expéditeur. Elles fonctionnent comme un dossier de courrier, mais avec plus de souplesse :
1. Créez un libellé: Cliquez sur "Créer une nouvelle étiquette" dans le menu de gauche de Gmail et donnez-lui un nom.

2. Appliquer des étiquettes automatiquement: Utilisez des filtres pour étiqueter les courriels provenant d'expéditeurs spécifiques.
3. Afficher les courriels par étiquette: Cliquez sur le libellé dans le menu pour afficher tous les courriels liés regroupés.
Les étiquettes facilitent l'organisation des courriels et permettent de retrouver les messages sans avoir à effectuer des recherches répétées.
Suivre les e-mails dans Gmail comme un pro avec MailTracker
Simplifiez la gestion de vos courriels avec MailTracker. Qu'il s'agisse de trier par expéditeur ou de suivre les ouvertures, MailTracker vous offre les outils nécessaires pour rester organisé et productif :
- Alertes en temps réel : Sachez instantanément quand vos e-mails sont ouverts.
- Rappels de suivi : Ne manquez plus jamais un e-mail important.
- Intégration transparente : Ajoutez MailTracker à Chrome pour une meilleure expérience de Gmail.
Essayez-le aujourd'hui gratuitement - ajoutezMailTracker à Chrome et gérez mieux vos courriels !


