

Gmail filters help you sort and organize incoming emails automatically. You can label, archive, or delete messages based on specific rules, keeping your inbox clean and easy to manage.
In this article, you’ll learn three simple ways to create filters in Gmail—using the search bar, settings, and directly from an email. You'll also find out how to edit, delete, and manage filters to keep your inbox organized.
What is a Gmail Filter?
A Gmail filter is a tool that automatically sorts your emails based on rules you set. It helps organize incoming messages by applying specific actions, such as moving emails to folders, marking them as read, or deleting them.
Filters work by looking for certain details in an email. You can sort emails by sender’s address, the recipient, keywords in the email subject line, or words in the email body.
Filters can also sort messages by date, whether they have attachments or their size.
For example, if you want all emails from a specific sender to go to a separate folder, you can create a filter to do that automatically.
If you receive a lot of sales emails, you can set a filter to mark them as read or send them to a specific label. Gmail filters make it easier to manage emails without sorting them manually.
Why is it Important to Filter Emails?
Creating Gmail filters helps keep your inbox organized by sorting emails automatically. Without filters, important messages can get lost in a flood of promotional emails, spam, and newsletters.
Filtering saves time by reducing the need to sort emails manually and ensures you don’t miss critical messages.
With filters, completed project emails can be archived, spam can be blocked before reaching your inbox, and old emails can be deleted without effort.
Promotional emails can be marked as read so they don’t clutter your inbox. Filters can also be used to send auto-replies, making communication more efficient.
In short, using Gmail filters, your inbox stays clean, and you can focus on the emails that matter most.
How to Create a Filter in Gmail: 3 Methods
There are three simple ways to create filters in Gmail: using Gmail settings, the search bar, or directly from an email. Let's get started!
Method 1: Filter Emails in Gmail from the Settings
Using Gmail settings to create a filter gives you more control over how your emails are organized.
This method lets you set up detailed filters based on specific criteria like the sender’s email address, subject line, or keywords. It also allows you to see and manage all your existing filters in one place.
1. Go to Gmail: Open your Gmail account in your web browser.
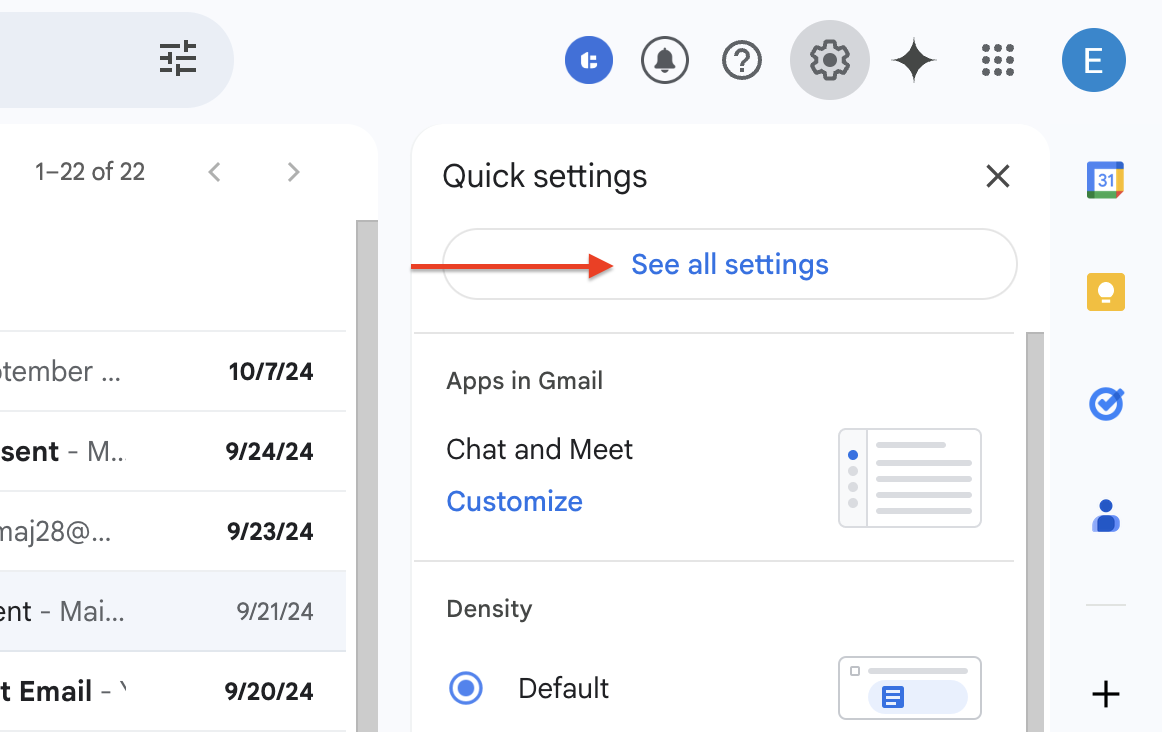
2. Access Settings: Click on the settings icon in the top right corner, then select "See all settings."
3. Navigate to Filters: Go to the "Filters and Blocked Addresses" tab in the settings menu.
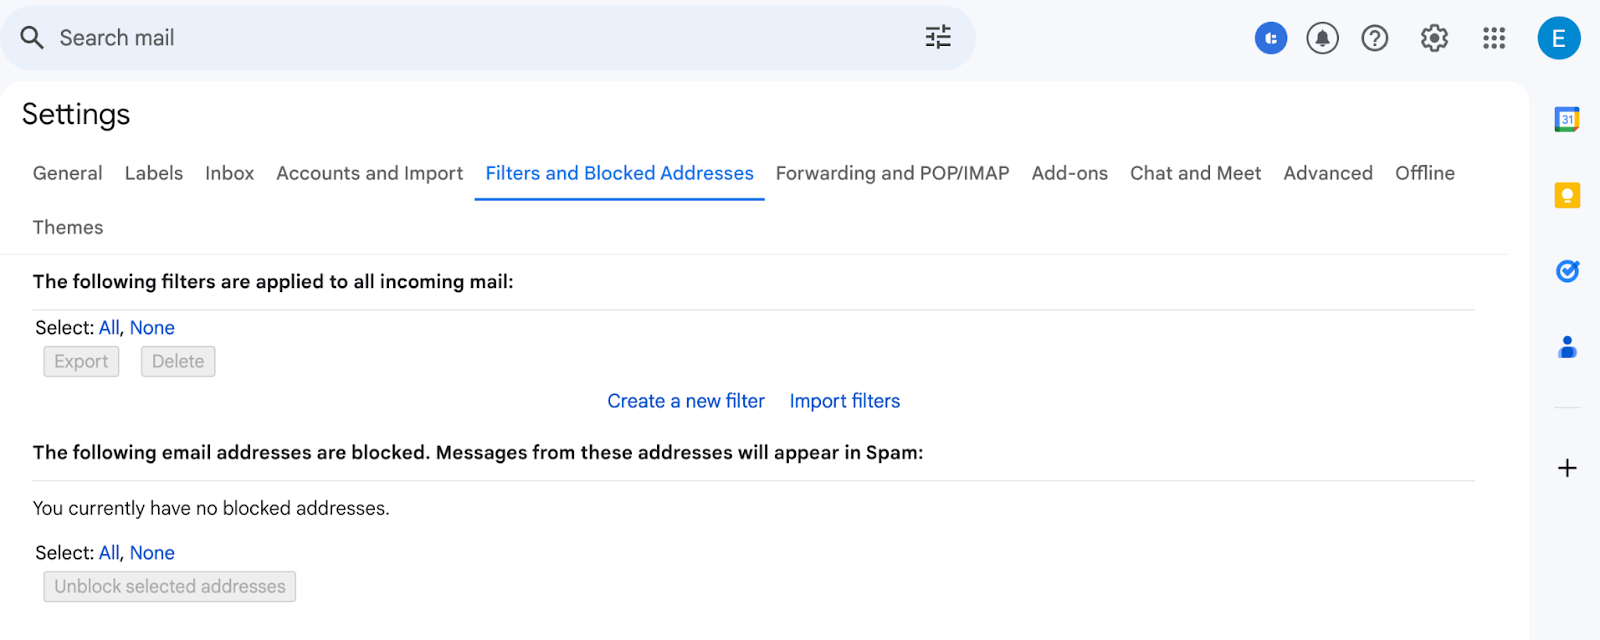
4. Create a New Filter: Click on "Create a new filter". This will open a form where you can specify your filter criteria.
Method 2: Filter Emails Using the Search Bar
The second method is the fastest way to filter emails without going into settings.
Using the Gmail search bar, you can find emails based on specific words, senders, or other details, then instantly turn that search into a filter. It’s useful when you want to organize similar emails without manually sorting them.
1. Open Gmail: Log in to your Gmail account.
2. Use the Search Bar: At the top of the page, enter the search criteria you want to filter by (e.g., specific sender, keywords, etc.).
3. Create Filter from Search: Click on the small arrow on the right side of the search bar to open the advanced search options. After entering your criteria, click on "Create filter" at the bottom of the dropdown.

4. Specify Filter Actions: Choose the actions you want Gmail to take for emails matching your criteria (e.g., archive, mark as read, etc.), and then click on "Create filter."
Method 3: Filter Emails Directly from an Email
The last method is best when you want to filter similar emails from a specific sender.
Instead of searching or adjusting settings, you can create a filter straight from an email you’ve already received. This is a quick way to manage future messages from the same sender without extra steps.
1. Open Gmail: Log in to your Gmail account.
2. Select an Email: Open an email you want to create a filter for.
3. Access Filter Options: Click on the three-dot menu (⁝) at the top right of the email, then select "Filter messages like this."

4. Create Filter: A form with the email's sender and other criteria will appear. Adjust these as needed, then click "Create filter".
5. Specify Filter Actions: Choose the actions for the filter (e.g., delete, label, forward, etc.), and click "Create filter."
How to Manage Your Gmail Filters
Once you’ve set up filters in Gmail, you may need to edit or delete them over time. If your email needs to change, you can update filters to match new criteria or remove filters that are no longer useful.
How to Edit a Gmail Filter
If you make a mistake or need to refine an existing filter, you can edit it instead of creating a new one.
1. Open Gmail and log in to your account.
2. Click the gear icon in the top right and select See all settings.
3. Go to the Filters and Blocked Addresses tab.
4. Find the filter you want to edit and click Edit.
5. Adjust the search criteria as needed and click Continue.
6. Update the filter’s actions, then click Update filter to save changes.
How to Delete a Gmail Filter
If a filter is no longer needed, you can delete it in just a few steps.
1. Open Gmail in your web browser.
2. Click the gear icon and select See all settings.
3. Go to the Filters and Blocked Addresses tab.
4. Locate the filter you want to delete and click Delete.
5. Click OK to confirm and remove the filter.
Gmail Filters to Keep Your Inbox Organized
Managing multiple addresses can take up too much time, but Gmail filters can help by automating common tasks. With the right filters, you can keep your inbox organized, reduce distractions, and focus on what matters.
Here are four useful filters to improve your productivity.
Remove Automatic Replies
Out-of-office responses and automated replies can clutter your inbox. To keep them out of the way, create a filter that automatically deletes them.
1. Click the Show search options icon in the Gmail search bar.
2. In the Subject field, type "automatic reply".
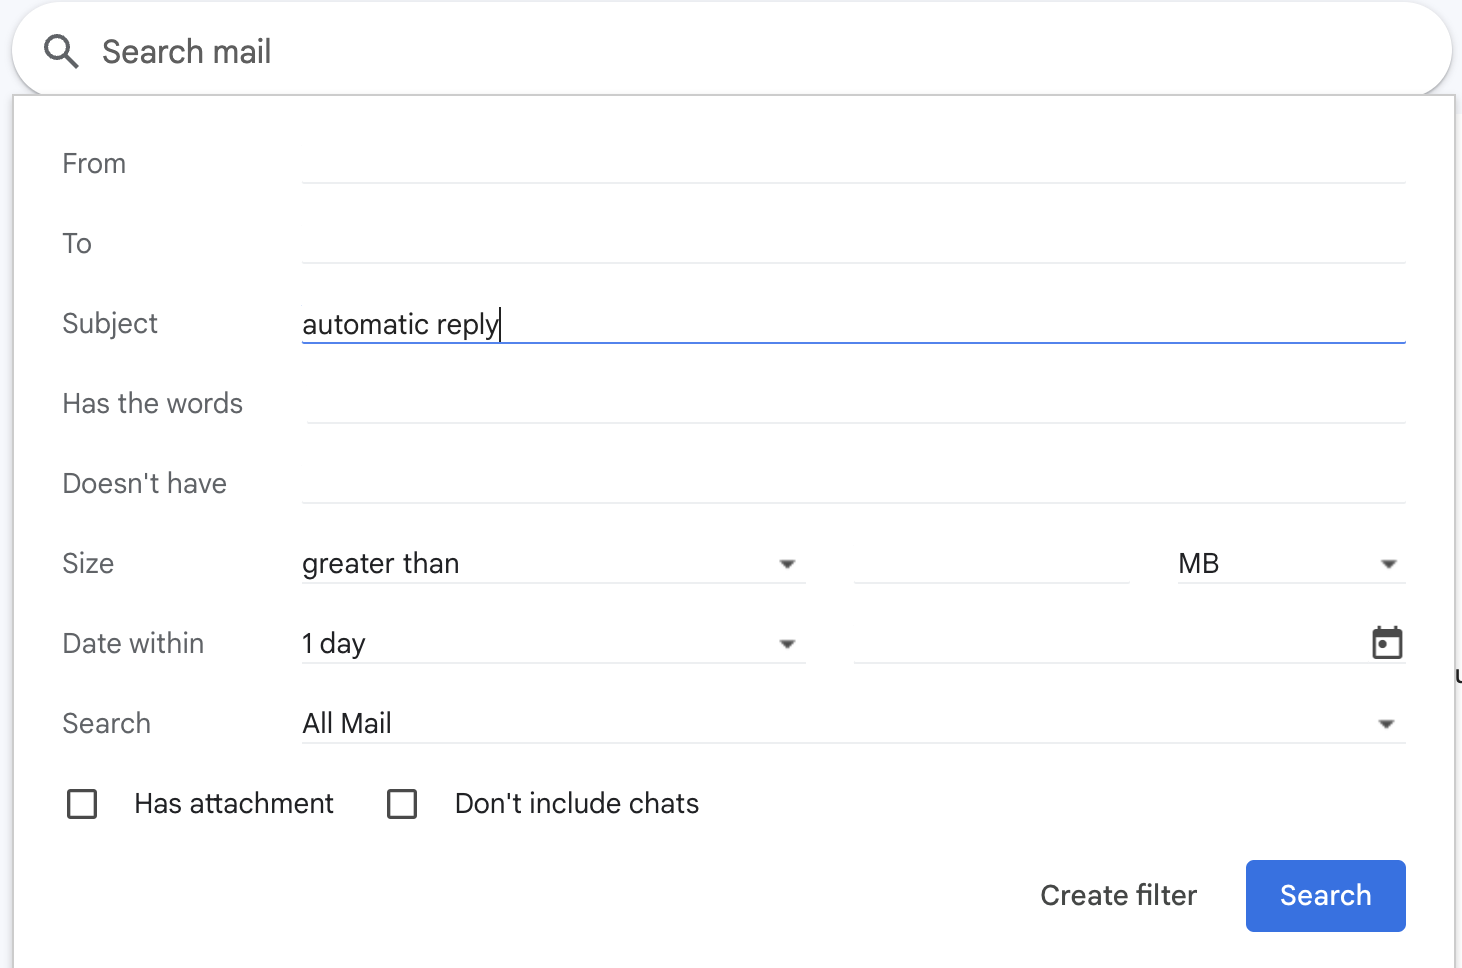
3. Click Create filter at the bottom.
4. Select Delete it, then click Create filter again.
Now, Gmail will automatically remove any email with “automatic reply” in the subject line.
Organize Newsletters in One Folder
Instead of letting newsletters fill up your inbox, you can send them to a separate folder using a simple trick with your email address.
1. Click the Show search options icon in the Gmail search bar.
2. In the To: field, enter your email with “+newsletters” at the end, like yourname+newsletters@gmail.com.
3. Click Create filter at the bottom.
4. Select Apply the label, then click New label and name it “Newsletters.”
5. Click Create filter to finish.
Now, every time you sign up for a newsletter using this email variation, Gmail will send it straight to your "Newsletters" folder instead of your inbox.
Stop Calendar Notifications from Cluttering Your Inbox
Google Calendar automatically sends email notifications when someone accepts your meeting invite, but you don’t need to see them in your inbox. You can create a filter to archive them automatically. If you would like to know more about how to change your Gmail notifications, read our guide.
1. Click the Show search options icon in the Gmail search bar.
2. In the Has the words field, type "filename:invite.ics AND accepted".

3. Click Create filter at the bottom.
4. Select Skip the Inbox and Mark as read.
5. Click Create filter to save it.
Now, these notifications won’t clutter your inbox, but you can still find them in your All Mail folder if needed.
Send Automatic Replies with Canned Responses
If you often send the same response to certain emails, Gmail’s template feature lets you automate replies.
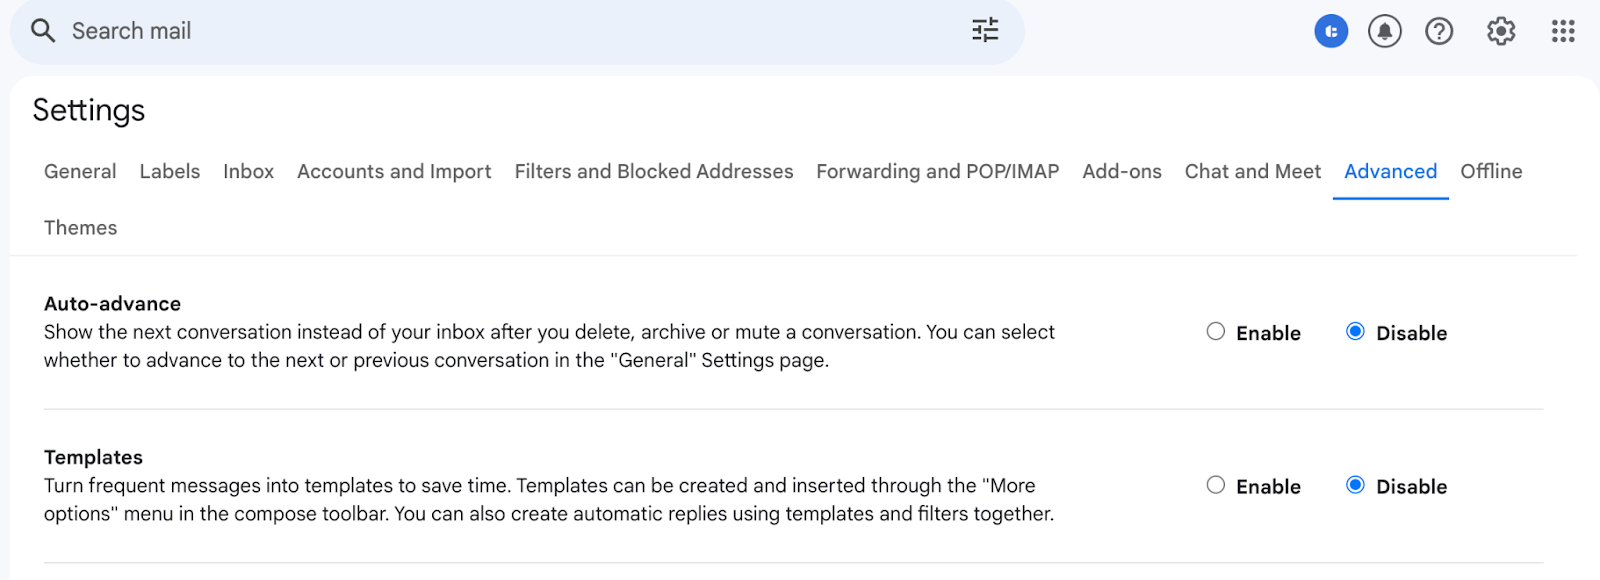
1. Go to Settings, click See all settings, then open the Advanced tab.
2. Find Templates, enable it, and click Save changes.
3. Compose a new email, click the three-dot menu, select Templates > Save draft as template > Save as new template, then name and save it.

4. Click the Show search options icon in the Gmail search bar.
5. In the Has the words field, enter a keyword that will trigger the reply, then click Create filter.
6. Select Send template, then choose the saved template. Click Create filter to finish.
Now, whenever Gmail detects the keyword in an email, it will automatically send your pre-written response.
Take Control of Your Gmail with MailTracker
Filtering emails is just one way to stay organized, but if you manage multiple email addresses or need better email tracking, MailTracker can help.
Over 100,000 freelancers, managers, and professionals use MailTracker to stay on top of their emails.
With real-time email open notifications, follow-up reminders, and advanced tracking features, you’ll always know when someone read your email in Gmail. No more guessing or missed opportunities.
Start managing your Gmail more efficiently—Add MailTracker to Chrome for free today.
