Eliminar mensajes de correo electrónico en Gmail puede parecer complicado, especialmente para los principiantes. Esta guía te guiará paso a paso por el proceso, tanto si utilizas un ordenador como un dispositivo móvil.
También te explicaremos por qué es importante eliminar los correos electrónicos antiguos y cómo asegurarte de no perder información importante en el proceso.
If your inbox is filled with unnecessary sales emails, we’ve also added a section on how to delete all promotions in Gmail and bulk delete.
Empecemos.
Why Is It Important to Delete Your Emails?
Borrar correos electrónicos puede parecer una molestia, pero puede suponer una gran diferencia. He aquí por qué:
- Save Storage Space: Gmail offers 15 GB of storage, shared with Google Drive and Photos. Clearing out emails in Gmail prevents you from running out of space.
- Better Organization: A clutter-free Gmail inbox makes it easier to find important Gmail messages.
- Improve Security: Old emails displayed in your account might contain sensitive data. Deleting them reduces risks.
- Simplify Navigation: Deleting unwanted emails and organizing your inbox with inbox customizations makes your Gmail app experience stress-free.
What to Do Before Deleting Your Emails
Before clearing out your inbox, take these steps to ensure you don’t lose important emails:
Identify Important Emails: Review your inbox for emails containing essential information, such as financial records or work documents. Use Gmail’s search bar or filters to locate specific emails, then flag, star, or move them to a folder.
Back Up Emails: Export important emails to a secure location. Gmail allows you to download emails using Google Takeout or third-party backup tools.
Organize Your Inbox: Sort your emails by sender, or categories like Promotions or Social to delete bulk emails more efficiently.
How to Delete Emails in Gmail
Here are clear steps for deleting emails, whether you want to remove a few or clear out everything.
Deleting Emails on the Web
1. Log In to Gmail: Open a web browser, visit Gmail, and sign in with your email and password.
2. Select Emails:
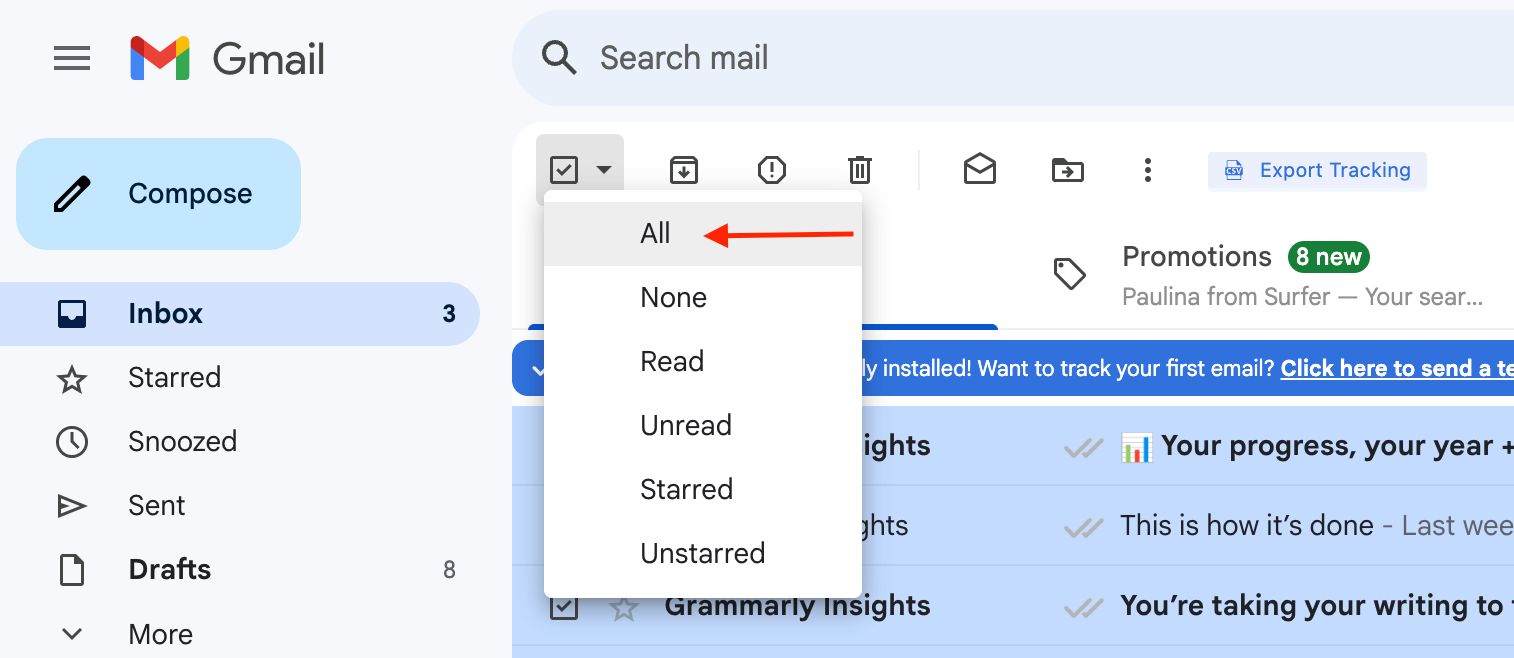
- Check the small box at the top-left corner of your inbox to select the emails on the current page (usually 50-100 emails).

- To select all emails, click the option that says “Select all conversations in [category or inbox]” that appears at the top of the screen.
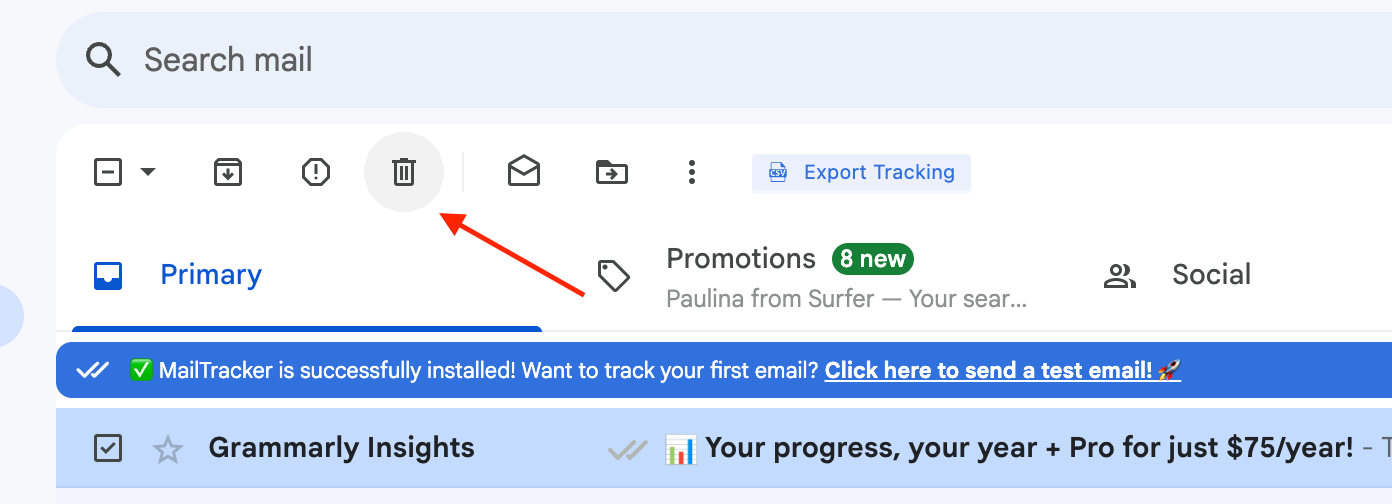
3. Delete Emails: Click the trash can icon to move the selected emails to the Trash folder.

4. Empty the Trash:
- Click on Trash in the left-hand menu.
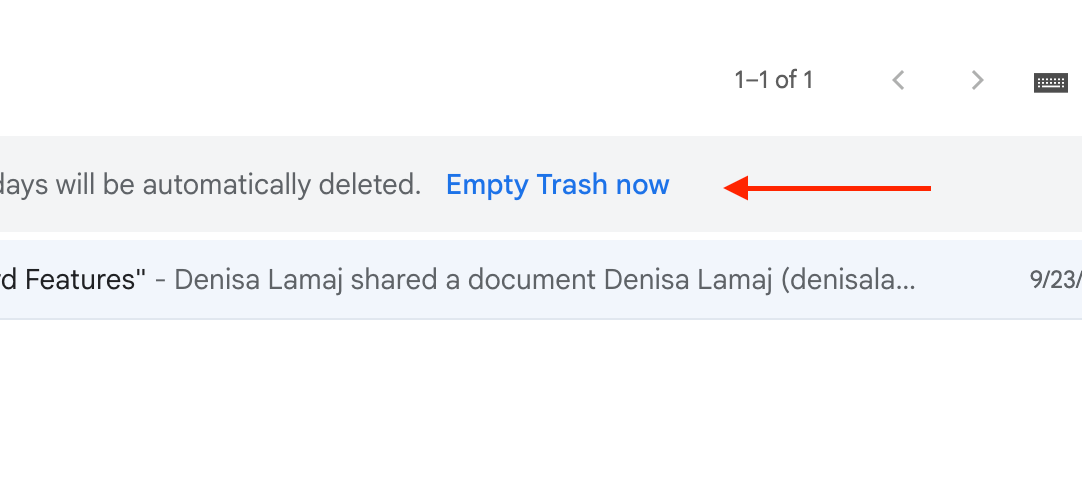
- Select “Empty Trash now” to permanently delete the emails.

💡 Note: Emails in the Trash folder will automatically be deleted after 30 days if you don’t manually clear them.
How to Delete Emails on Mobile
To delete emails on your phone using the Gmail mobile app:
1. Open Gmail App: Launch the app and log in to your Gmail account.
2. Select Multiple Emails: Long-press an email to select it. Use the left swipe or additional taps to select more. If mail swipe actions are enabled, customize the swipe direction in the settings icon to delete emails faster.

3. Click Delete: Tap the trash icon to delete the selected emails.
4. Clear Trash: Open Trash from the menu icon, then tap “Empty Trash now” to free up space.
How to Mass Delete Emails in Gmail
If you need to mass delete Gmail emails across your account, follow these steps:
Mass Delete Emails on the Web
1. Log In to Gmail: Open Gmail and sign in to your Gmail account.
2. Select Emails:
- Use the checkbox at the top-left to select emails displayed on the current page.
- Click the blue text that says “Select all x conversations in [Inbox or category]” to include every email in the group.

3. Click Delete: Use the delete icon to move the selected emails to Trash.
4. Empty Trash: Navigate to Trash, then click “Delete forever” to permanently erase emails.
💡Tip: Use Gmail’s filter emails feature to locate and mass delete specific types of emails, such as those from a particular sender's email address or within a date range.
Mass Delete Emails on the Gmail App
1. Open Gmail App: Launch the Gmail mobile app on your device.
2. Access Categories: Use the menu icon to navigate to Promotions, Social, or other categories.
3. Select Emails: Long-press one email to select it, then tap additional ones to delete multiple emails.
4. Click Delete: Tap the trash icon to remove the emails.
How to Delete All Promotions in Gmail
Promotional emails often fill up your inbox with unnecessary messages. Here’s how to remove them in bulk:
On the Web
1. Go to the Promotions Tab: Open your inbox on the web or in the Gmail mobile app.
2. Select All Emails: Check the box at the top to select the emails displayed. Click the blue text that says “Select all conversations in Promotions” to include everything.

3. Click Delete: Use the trash icon to remove all your emails in this category.
4. Empty Trash: In the left-hand sidebar, go to Trash and click “Delete forever” to permanently delete them.
On Mobile
1. Open Gmail App: Launch Gmail and open the menu by tapping the three-line icon in the top-left corner.
2. Access Promotions: Tap Promotions to view emails in this category.
3. Select Emails: Tap and hold an email to select it, then tap additional emails as needed.
4. Delete Emails: Tap the trash can icon to move them to the Trash folder.
5. Empty Trash: Go to the Trash folder and tap “Empty Trash now” to complete the process.
How to Delete Specific Emails
You may want to delete emails based on criteria like sender or date. Here’s how to do it.
Delete Emails by Sender
1. Search for the Sender:
- Locate an email from the sender you want to remove.
- Right-click the email and select “Find emails from [sender]”. Gmail will display all emails from that sender.
2. Select Emails:
- Click the checkbox to select emails on the current page.
- Click “Select all conversations that match this search” to include every email from the sender.
3. Delete Emails: Click the trash can icon to delete the selected messages.
Delete Emails by Date
1. Search by Date Range:
- Click the search bar and use the filter icon to open advanced search options.
- Enter a date range in the Date within field.
- Click Search to display all emails from that period.
2. Select and Delete:
- Use the checkbox to select emails.
- Click “Select all conversations that match this search” and then the trash can icon to delete them.
How to Recover Deleted Emails
If you’ve accidentally deleted emails and need to restore them:
1. Go to Trash: Navigate to the Trash folder in the left-hand sidebar.
2. Recover Deleted Emails: Find the message, select it, and move it back to your inbox.
💡Tip: Emails in Trash can only be recovered within 30 days before being permanently deleted.
Simplify Email Management With MailTracker
Handling a cluttered Gmail inbox can feel overwhelming, especially if you’re managing multiple emails in Gmail daily.
Whether you’re a freelancer, consultant, manager, or someone managing mass emails, staying on top of your messages doesn’t have to be stressful.
This is where MailTracker comes in. Here's what you can do:
- Track Your Emails: Get real-time notifications when your email in Gmail is opened, so you’re never left wondering if it reached the recipient's inbox.
- Read Receipts: Automatically notify senders that you’ve received and read their email without having to write a reply. This feature is perfect for situations where you need time to respond but still want to acknowledge their message.
- Reply Later Feature: Quickly acknowledge important Gmail messages and let the sender know a detailed reply is on the way.
- Improve Response Rates: By using MailTracker’s tools to manage unread emails and follow-ups, you ensure timely responses and avoid missed opportunities.
Start today with our forever free plan—add MailTracker to Chrome and improve your email management.


