Tener una firma de correo electrónico profesional en Gmail es un paso esencial para mejorar tu comunicación y tu imagen de marca.
Una firma de correo electrónico bien elaborada añade credibilidad, promociona su marca y facilita que los destinatarios se pongan en contacto con usted.
Esta guía te mostrará cómo crear, personalizar y gestionar una firma de Gmail paso a paso.
También exploraremos opciones avanzadas como añadir imágenes, iconos de redes sociales y utilizar varias firmas para distintos escenarios.
Por qué es importante la firma de Gmail
Una firma de correo electrónico es algo más que su nombre. Es una oportunidad para proporcionar información esencial, promocionar su empresa y dejar una impresión duradera. Una firma profesional puede incluir:
- Tu nombre y cargo.
- Información de contacto, como su número de teléfono o sitio web.
- Enlaces o iconos de redes sociales.
- El logotipo de su empresa o una firma HTML con elementos de marca.
Tanto si quieres crear una firma básica como una más elaborada, Gmail te ofrece herramientas para crear y gestionar fácilmente tu firma.
Cómo añadir una firma de correo electrónico personalizada en Gmail
Aquí tienes una guía completa para crear una nueva firma para tu cuenta de Gmail.
Paso 1: Abrir la configuración de Gmail
1. Accede a tu bandeja de entrada de Gmail en un ordenador de sobremesa.
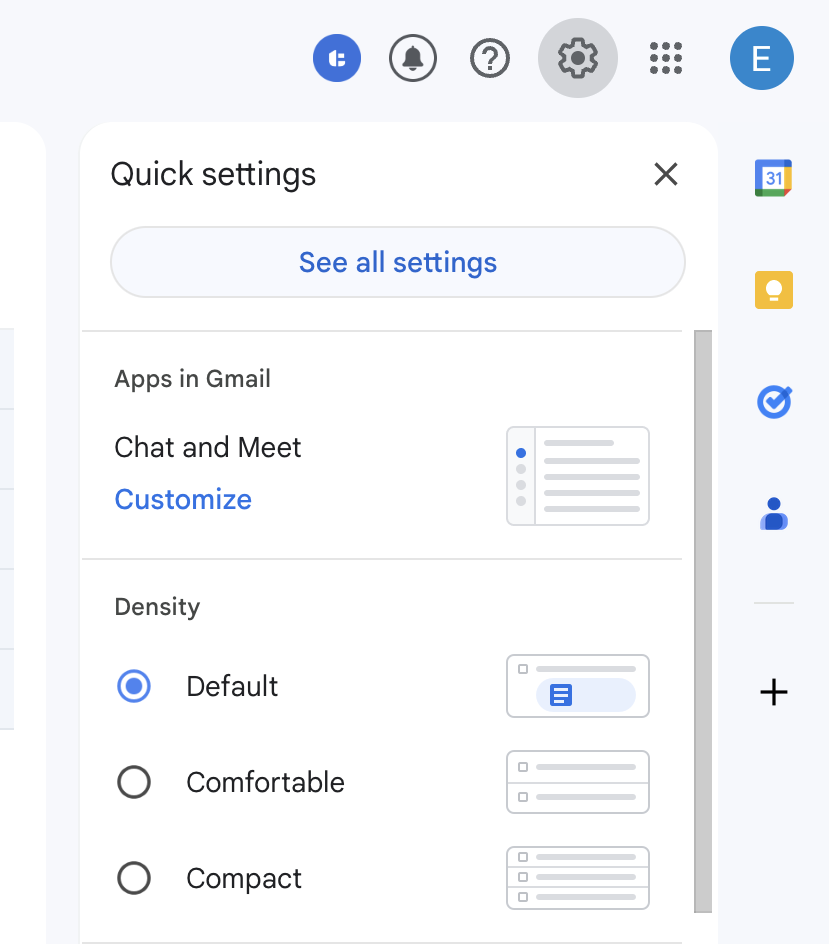
2. En la esquina superior derecha, haz clic en el icono del engranaje para abrir la configuración.

3. Selecciona "Ver todos los ajustes" para acceder a la página de ajustes completa.

Paso 2: Crear una nueva firma de Gmail
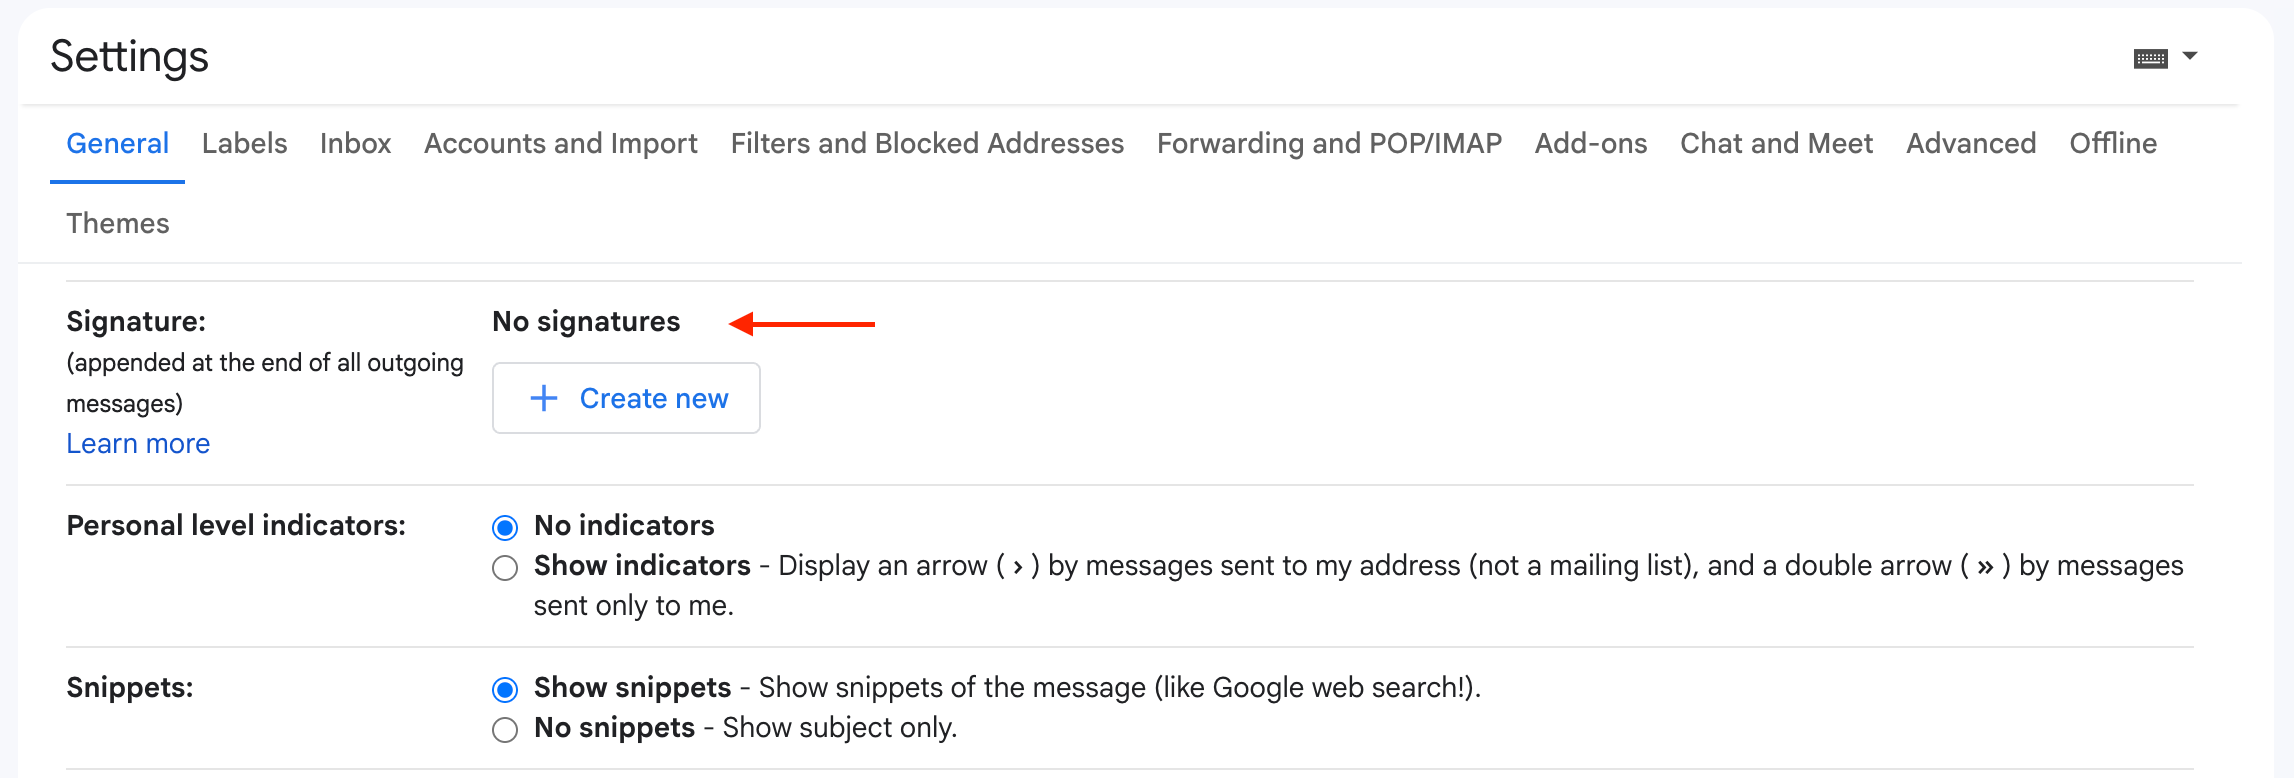
1. En el menú de configuración, vaya a la pestaña "General".
2. Desplácese hasta la sección "Firma" .

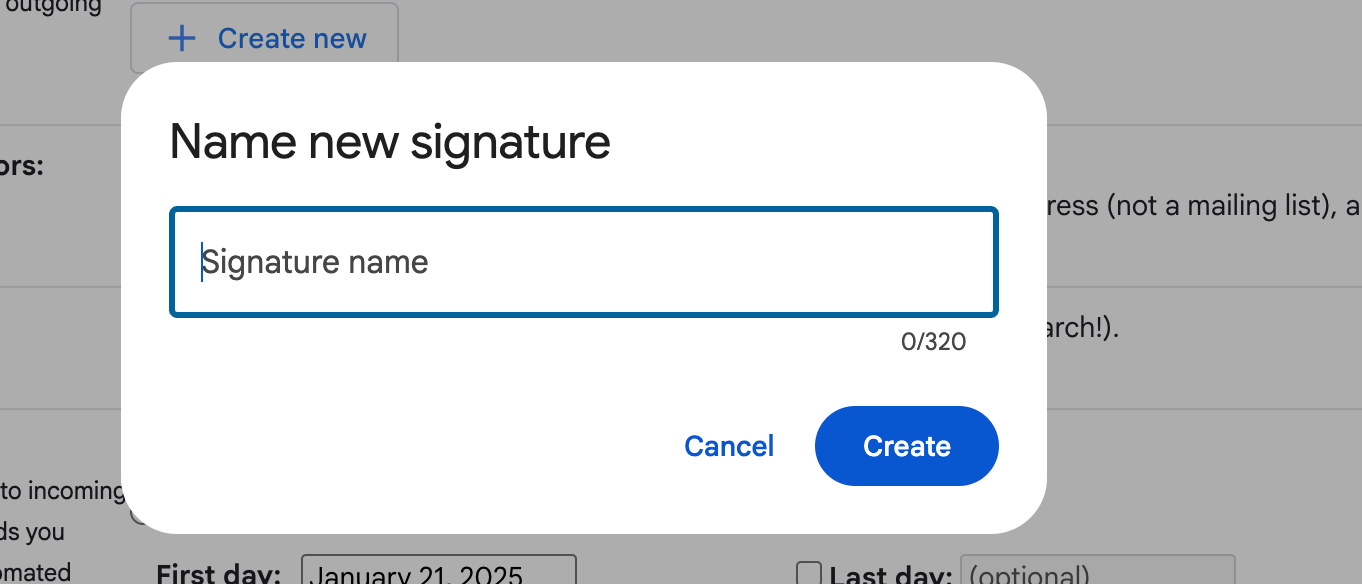
3. Haga clic en "Crear nuevo".
4. Introduzca un nombre para su firma (por ejemplo, "Trabajo" o "Personal") y haga clic en"Crear".

Paso 3: Añada sus datos de contacto
En el editor de firmas de Gmail, empieza por introducir los datos básicos:
- Tu nombre.
- Tu cargo.
- Su número de teléfono.
- La dirección de su empresa o su sitio web.

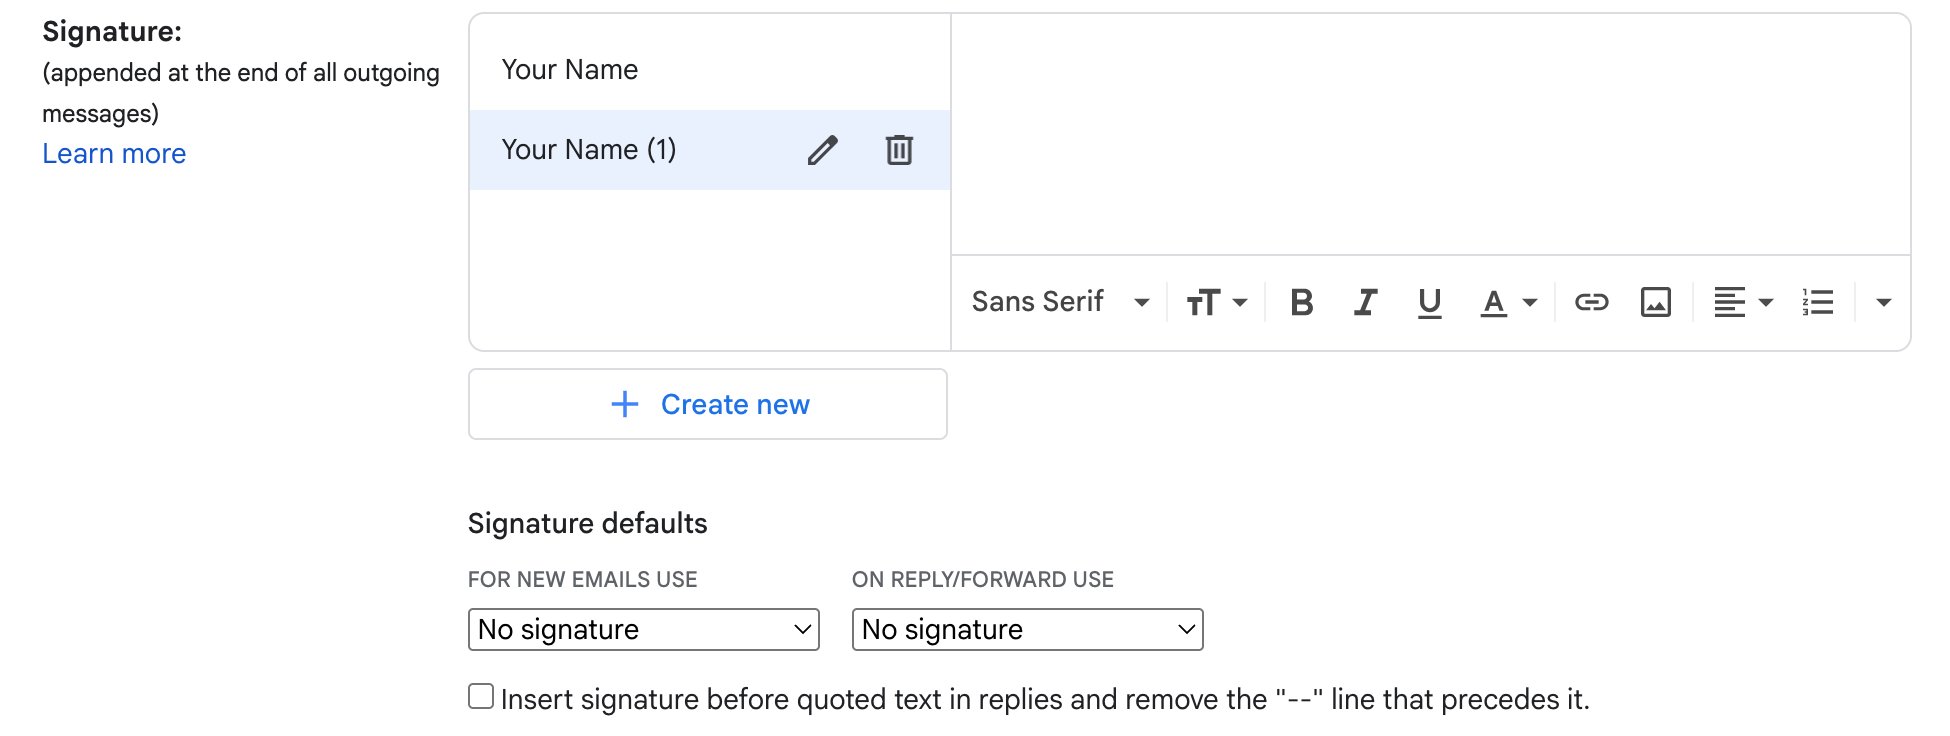
También puedes editar la firma fácilmente haciendo clic en el icono del bolígrafo.
Paso 4: Personalice su firma
1. Dar formato al texto: Utiliza el editor para cambiar el tipo de letra, poner el texto en negrita, cursiva o ajustar el tamaño. Resalta detalles clave como tu puesto de trabajo.
2. Añadir enlaces: Seleccione texto (por ejemplo, la URL de su sitio web) y haga clic en el icono de cadena para insertar un hipervínculo.
3. Insertar iconos sociales: Sube pequeños iconos clicables de redes sociales (por ejemplo, LinkedIn, Twitter) y enlázalos a tus perfiles.
4. Incluya una imagen o logotipo:
- Haz clic en el icono de la imagen en el editor.
- Cargue su logotipo o enlace una imagen de su sitio web. Asegúrese de que el tamaño de la imagen es adecuado para evitar ralentizar la carga del correo electrónico.

Paso 5: Establecer la firma por defecto
Decida dónde aparecerá su firma:
- Para los mensajes nuevos, seleccione su firma principal.
- Para las respuestas y los reenvíos, puedes elegir una firma más sencilla o ninguna. Haga clic en Insertar firma antes del texto citado en las respuestas.

Utilice el menú desplegable situado junto a cada opción de la sección de valores predeterminados de firma para asignar firmas.
Paso 6: Guardar cambios
Desplázate hasta el final de la página y haz clic en "Guardar cambios". De este modo, su firma estará activa y aparecerá en sus correos electrónicos.
Si desea algunos ejemplos de firmas, eche un vistazo a nuestro artículo sobre: Ejemplos de Firma de Email [+ Generadores de Email Gratuitos]
Cómo crear varias firmas en Gmail
Gmail te permite crear varias firmas para distintos fines, como correos electrónicos de trabajo, personales o basados en proyectos.
1. Siga los pasos 1-4 anteriores para crear su primera firma.
2. Para añadir una firma diferente, vaya a la sección Firma y haga clic en "Crear nueva".

3. Nombra y diseña la nueva firma con un contenido diferente.
4. Cuando redactes un correo electrónico, haz clic en el icono del lápiz situado debajo del mensaje para cambiar entre las firmas guardadas.
Lectura recomendada: 31 plantillas de correo electrónico en frío para conseguir más ventas
Cómo añadir la firma de Gmail en dispositivos móviles (Android y iPhone)
Si utilizas Gmail principalmente en un dispositivo móvil, tendrás que configurar una firma por separado en la aplicación de Gmail.
Para Android:
1. Abre la aplicación de Gmail y toca el menú de la esquina superior izquierda.
2. Desplácese hacia abajo y pulse "Ajustes".
3. Seleccione la cuenta para la que desea añadir una firma.
4. Pulse "Firma móvil" e introduzca el texto de la firma.
5. Los cambios se guardan automáticamente y el texto de la firma aparecerá en todos los correos electrónicos enviados desde tu dispositivo.
Para iPhone:
1. Abre la aplicación de Gmail y toca el menú (tres líneas horizontales).
2. Vaya a Configuración y elija su cuenta.
3. Active la opción "Firma móvil".
4. Introduzca los datos de su firma y pulse Atrás para guardar.
Consejos avanzados para conseguir firmas de Gmail profesionales
He aquí algunos consejos a tener en cuenta:
Utiliza un generador de firmas de Gmail
Si buscas una firma elegante y pulida, considera la posibilidad de utilizar un generador o creador de firmas de Gmail.
Estas herramientas le ayudan a diseñar firmas de correo electrónico profesionales con el mínimo esfuerzo. Suelen ofrecer plantillas que incluyen:
- Botones clicables para acciones como concertar una reunión o visitar su sitio web.
- Los iconos de redes sociales que enlazan directamente con sus perfiles aumentan la participación.
- Banners para promociones, eventos o mensajes de marca.
- Diseños flexibles para incorporar logotipos, títulos de puestos e información adicional.
Utilizar un generador no sólo ahorra tiempo, sino que también garantiza que tu firma tenga un aspecto profesional y se ajuste a la etiqueta moderna del correo electrónico.
Añadir una firma HTML
Una firma HTML permite un diseño más personalizado y de marca.
Si tiene elementos de marca específicos, como un esquema de colores de la empresa o la colocación del logotipo, HTML ofrece la flexibilidad necesaria para crear una firma que destaque.
- Para utilizar una firma HTML, diseña tu firma utilizando un editor HTML o una herramienta de plantillas.
- Copia el código HTML y pégalo en el editor de firmas de Gmail.
- Gmail renderizará el HTML, permitiéndote previsualizar el diseño antes de aplicarlo.
Este enfoque es especialmente útil para empresas o particulares que desean una firma de gran impacto y visualmente atractiva.
Incluir enlaces a redes sociales
Añadir iconos de redes sociales a tu firma es una forma sencilla de mejorar la conectividad y el compromiso. Para un toque profesional:
- Utilice iconos pequeños y limpios para plataformas como LinkedIn, Twitter o Instagram.
- Vincula cada icono directamente a tu perfil o página de empresa.
- Coloque los iconos ordenadamente en una fila o columna debajo de sus datos de contacto para facilitar el acceso.
Estos iconos no sólo ayudan a los destinatarios a conectar con usted a través de múltiples plataformas, sino que también impulsan su presencia en línea.
Errores comunes en el diseño de firmas
Aquí tienes tres cosas principales que debes evitar al crear una firma de correo electrónico.
Demasiada información
Aunque es tentador incluir todos los detalles sobre ti o tu empresa, sobrecargar tu firma puede hacer que parezca recargada y poco profesional. Limítate a lo esencial:
- Nombre y cargo.
- Número de teléfono.
- Dirección de correo electrónico o sitio web.
- Un par de enlaces en los que se puede hacer clic.
Evite añadir renuncias largas o citas innecesarias a menos que lo exija la política de la empresa.
Imágenes de gran tamaño
El uso de imágenes de gran tamaño en tu firma, como un logotipo o una foto de perfil, puede ralentizar el tiempo de carga del correo electrónico y no mostrarse correctamente en todos los dispositivos. Para evitarlo:
Redimensiona las imágenes a un formato pequeño y apto para la web antes de subirlas.
Utilice un tamaño de archivo inferior a 100 KB siempre que sea posible.
Estilos incoherentes
Un formato o estilo incoherente en las firmas de tu equipo puede dañar tu imagen de marca. Asegúrate de que todos los miembros de tu organización utilizan el mismo:
Estilo y tamaño de letra.
Combinación de colores.
Disposición y elementos de diseño.
Puedes estandarizarlo compartiendo una plantilla de firma o utilizando un generador que permita su aplicación en todo el equipo.
Lectura recomendada: 20 ejemplos de correos electrónicos de agradecimiento posteriores a una entrevista para cualquier situación
Paso final: Prueba tu firma de Gmail
Antes de enviar correos electrónicos con tu nueva firma, envíate un correo de prueba a ti mismo o a un colega. Compruebe que:
Los enlaces funcionan correctamente.
Las imágenes se muestran correctamente.
El formato parece profesional.
Mejora tu experiencia de Gmail con MailTracker
Gestionar el correo electrónico es más fácil con MailTracker, una potente herramienta que se integra a la perfección con Gmail. Con MailTracker, puedes:
- Supervisa en tiempo real el momento en que los destinatarios abren tus correos electrónicos en Gmail.
- Realice un seguimiento de las métricas de rendimiento, como la tasa de apertura, para optimizar la comunicación por correo electrónico.
- Manténgase informado sobre sus esfuerzos de difusión con notificaciones en tiempo real.
Más de 100.000 usuarios confían en MailTracker para simplificar sus flujos de trabajo de correo electrónico.
Pruebe MailTracker gratis hoy mismo y descubra cómo puede transformar su forma de gestionar el correo electrónico.
También puedes contratar un plan Premium para un seguimiento ilimitado.


