Managing your Gmail notifications effectively can help you stay on top of important emails without being overwhelmed by constant alerts.
Let's walk through the steps to customize your Gmail notification settings on both desktop and mobile devices.
How to Change Gmail Notifications on Desktop (Windows and macOS)
Let's get right to the sites on how to change and manage your Gmail notifications on your desktop.
Step 1. Access Gmail Settings:
1. Open your preferred browser and log in to your Gmail account.
2. In the top-right corner, click on the gear icon (⚙️) to open the Quick Settings menu.

3. From the dropdown, select "See all settings" to access the full Gmail settings page.
Step 2. Enable Desktop Notifications:
1. In the "General" tab, scroll down to the desktop notifications section.
2. Click on the link that says "Click here to enable notifications for Gmail."
3. Your browser will prompt you to allow Gmail to display notifications. Click "Allow" to turn Gmail notifications.
Step 3. Choose Notification Preferences:
After enabling, you can choose the notification option that best fits your needs. Select New mail notifications on if you want to stay updated on every incoming email.
If you prefer to focus only on key messages, choose Important mail notifications on to receive alerts for emails marked as important.

For those who want to avoid interruptions, opt for Mail notifications off to disable all notifications.
Step 4. Save Changes:
1. Scroll to the bottom of the page and click "Save Changes" to apply your new settings.

Tip: To ensure you receive notifications, keep your browser open. If you use Google Chrome, extensions like Checker Plus for Gmail can provide notifications even when the browser is closed.
How to Manage Gmail Notifications on Mobile Devices (iOS and Android)
If you are using a mobile device, an Android or iOS, then get to the steps:
Step 1. Open Gmail App Settings:
1. Launch the Gmail app on your mobile device.
2. Tap the three horizontal lines (☰) in the top-left corner to open the menu.
3. Scroll down and tap settings.
4. Choose the Gmail account you want to adjust notifications for.
Step 2. Configure Notification Preferences:
Whether you are using iOs or an Android phone, let's check the steps for both:
For iOS:
1. Tap settings > "Notifications."
2. Select your preferred notification settings: All new mail to get notified of every incoming email, Primary only for emails in your Primary category, or None to turn off and stop and tap email notifications.
Para Android:
1. Tap settings > "Notifications."
2. Choose between: Choose between: All to receive notifications for all emails, High priority only for important communications and high-priority emails, or None to disable email notifications.
Step 3. Ensure System Notifications Are Enabled:
Make sure that notifications for the Gmail app are enabled in your device's system settings:
iOS:
1. Go to "Settings" > "Notifications" > Gmail.
2. Toggle "Allow Notifications" to on.
Android:
1. Go to "Settings" > "Apps & notifications" > Gmail > "App notifications."
2. Ensure notifications for Gmail are enabled.
Note: Notification settings can vary by device. For more detailed instructions, refer to Google's official support page.
How to Set Up Gmail Vacation Responder
Step 1. Log in to your Gmail account. Click the gear icon (⚙️) in the top-right corner, and select "See all settings."
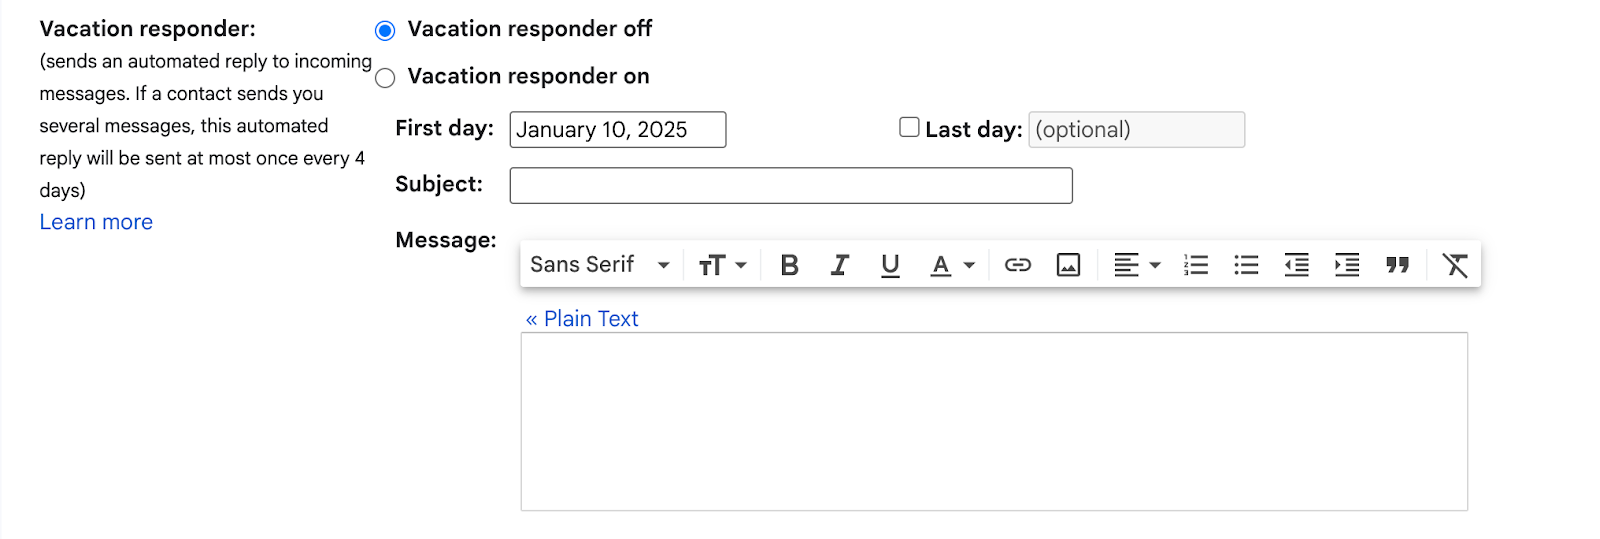
Step 2. Enable the Vacation Responder: In the "General" tab, scroll down to the Vacation Responder section and select Vacation responder on.

Step 3. Set Dates: Enter the First day for the auto-reply to start. Optionally, check the Last day box and choose when it should stop.
Step 4. Compose Your Auto-Reply: Add a Subject Line and write a Message (e.g., "I’m currently out of the office and will return on [date].").
Step 5. Save and Activate: Scroll down and click Save Changes. The responder will activate on the specified dates.
How to Mute Specific Conversations
If you're part of an email thread that's no longer relevant, you can mute it to stop email notifications for that conversation.
On Desktop:
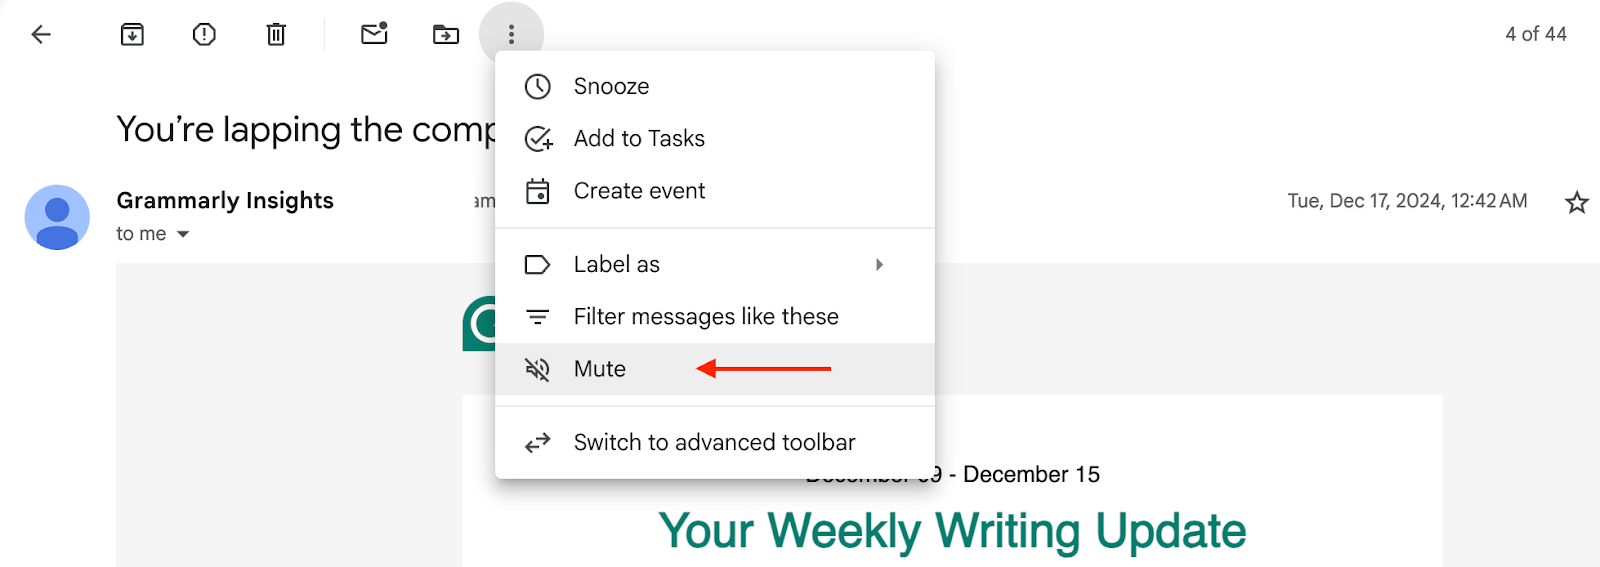
1. Open the email conversation you wish to mute.
2. Click on the three vertical dots (⋮) above the email to open the "More" menu.
3. Select "Mute."

On Mobile:
1. Open the Gmail app and navigate to the conversation you want to mute.
2. Tap the three vertical dots (⋮) in the top-right corner.
3. Choose "Mute."
Tip: If you mute a conversation it moves future responses to that thread directly to your archive, keeping your inbox clutter-free. You can still find these conversations by searching or checking the "All Mail" folder.
How to Snooze Emails
If you want to temporarily remove an email from your inbox and have it return at a more convenient time:
On Desktop:
- Open the email you want to snooze.

1. Click the clock icon (🕒) above the email.
2. Select click the date and time you'd like the email to reappear in your inbox.
On Mobile:
1. In the Gmail app, open the email.
2. Tap the three vertical dots (⋮) in the top-right corner.
3. Tap manage notifications.
4. Choose the desired time for the email to return.
Stay on Top of Gmail Notifications with MailTracker!
MailTracker is a free email tracker that lets you track your emails in Gmail for your multiple accounts, providing real-time notifications when someone reads your email in Gmail.
Also, you can discover the best times to send emails and manage your Gmail more effectively with MailTracker.


